Monday, March 24, 2014

Spectacular Bacon Meatloaf

My husband loves meatloaf.  He would eat it everyday if I would cook it for him.  Needless to say I am constantly creating new meatloaf recipes  in order to keep myself from getting bored cooking the same thing over and over again. 

Spectacular Bacon Meatloaf

2lbs ground beef

1lb bacon, divided

1c Italian bread crumbs

2 eggs, beaten

¾ c milk

1tbsp charbroil seasoning (or use a combination of garlic powder, onion powder, salt, and pepper….seasoned to your tastes)

1tbsp worcestshire sauce

¾ c shredded sharp cheddar cheese
1 onion, divided

In a large bowl combine eggs, milk, and breadcrumbs.  Mix well and let the bread crumb absorb the liquid.  Set aside. 

Cook all but seven slices of the bacon.  Set aside to cool. With the remaining bacon, create a lattice structure to layer on top of the meatloaf.  Use 3 full strips and cut the remaining for pieces in half for a total of 8 pieces.  Weave these between the longer strips and set aside. (see pic below)
Mmmm...bacon
Chop half the onion and add this to the bowl with the breadcrumb mixture.  Slice the other half of the onion, and sauté it in the bacon grease (you can also use butter or olive oil).   You want the onions to be translucent and just beginning to caramelize or turn slightly golden in color.  When onions are done set aside and allow them to cool.

 Add bacon, seasonings, worceshire, cheese, ground beef to the bowl.  Mix well.  Place mixture in a large loaf pan.  Layer sautéed onions on top of the meat, reserving a small amount.  Top with bacon lattice from previous step, tucking the ends of the bacon into the sides of the pan.  Finally garnish the meatloaf with the remaining onions.
Bake at 350*F for about 1hr 30min, and let sit for 15 minutes prior to serving. 


Saturday, March 15, 2014

A Feast Fit for a King Part 2


Roasts make me nervous.  I’m always afraid of overcooking or undercooking them, and I’m terrified I’m going to end up with a dried up piece of jerky.  I know, that totally makes it sound like I don’t know how to properly cook a roast.  I do, but it’s a stressful process for me because I am a bit of a perfectionist in the kitchen. 

Needless to say, when it came time to attempt this next recipe, I was a little intimidated.  I didn’t read any reviews on it.  I honestly had clue how it was going to turn out.  I was even more intimidated when I got to the grocery store and saw the price tag on the roast.  The ingredients for this recipe can be pricey depending on the season and where you live.  I assure you though; this recipe will produce an amazingly moist and tasty roast.

In addition to the salad in my previous post, I served the roast with a side of the roast leeks and carrots, a hard roll, and Onions in Gravy.  You can find the recipe for the Onions and Gravy below the recipe for the roast.

Aurochs Roasted with Leeks
1 hour of cook time will produce an amazing medium rare roast
3lbs Top Round Beef

6 Leeks (white and light green parts only), sliced ¼ in thick

4 Carrots cut into ¼ in thick slices

1 Head of Garlic (break into individual cloves and peel)

A small bunch of rosemary and thyme

Olive Oil

Kosher Salt

Black Pepper

Beef Stock

*Medieval Black Pepper Sauce (see below for recipe)

Preheat oven to 400*F, and remove beef from the fridge 30 minutes prior to cooking.  Place vegetables, garlic, and herbs in a roast pan and toss with a bit of olive oil.  Rub roast with olive oil, salt, and pepper, and then place it on top of the vegetable mix.  Add about ½ c beef stock to the bottom of the pan, and then place it in the oven.  Bake for 1 hour.  Around the 30 minute mark, check on the roast to make sure vegetables are not looking dry.  Baste the roast and veggies with another ½ c of beef stock.  Check for doneness by using a meat thermometer.  The internal temperature should be at least 145*F.  Allow roast to sit for 15 minutes before serving. 

Medieval Black Pepper Sauce

It's strong and peppery, but amazing on the roast.
1 slice of bread, toasted until black (make sure it’s good and burnt)

1/3c equal parts apple cider vinegar and water (add extra liquid if you would like a thinner sauce)

1tbspn red wine vinegar

1tbspn black pepper

¼ tsp ground ginger

Soak the burnt bread in the liquid in a small sauce pan until it begins to fall apart.  Use a fork to mash it.  Stir in the spices, and slowly bring the mixture to a boil. 

This can be rubbed across the entire roast once it has finished cooking, or you can add it to each slice upon serving.  It looks like watery mush when it is cooked, but trust me, it’s supposed to look that way.  This sauce is very peppery.  On its own it is pretty intense, but it pairs wonderfully with the roast. 

Onions in Gravy

Yum!
10oz pearl onions (peeled)

1tbsp honey

1tbsp unsalted butter

1 sprig of thyme, minced

1/3 c apple cider

1tbsp flour

3c beef stock

Salt

Pepper

Quarter 7 of the onions, and set the rest aside.  Heat a sauté pan over medium heat and add honey, butter, herbs, and the quartered onions.   Toss onions in the butter mixture to ensure they are evenly covered, and cook until the onions turn golden brown.  Make sure you stir frequently to prevent onions from burning.  Once the onions are golden brown, add the cider to the pan slowly to deglaze the pan.  This will help remove all the sticky goodness from the pan.  Evenly sprinkle the flour in the pan and stir.  Then add the stock and the remaining onions.  Cook for an additional 5 minutes, then reduce the heat and cook until the gravy reaches your desired consistency.  Make sure to taste and seasoning with salt and pepper before serving.  

It took me about 2 hours to prep and cook the complete meal.  It was a lot of prep work, but the end result was worth it.  This will be a meal I make again in the future. 

A Feast Fit for a King

I can't say enough about A Feast of Fire and Ice, the Official Game of Thrones cookbook.  I highly recommend this book to any GoT fan and foodie out there.  There is such a great variety of recipes and illustrations.  This is definitely one of my favorite cookbooks. 

Friday, March 14, 2014

Are You a Fan of The Game of Thrones? A Feast Fit for a King Part 1...


I am a huge Game of Thrones fan.  I’ve read the books multiple times.  I have the audiobooks so I can listen to the books during long car trips.  I’ve seen the show, and I’m quite impressed that HBO is actually sticking pretty close to the original story line (unlike other shows *cough*TrueBlood*cough*). 

Anyways, you can imagine my excitement when I learned there was an official Game of Thrones cookbook.  It’s called A Feast of Fire & Ice.  It is seriously a legit cookbook.  The recipes are based off of the various cuisines within the Game of Thrones world. 

I’ve wanted to test out the recipes for some time now, but lack of time has prevented me from doing some.  Some of the recipes require a bit prep time, and it’s really hard sometimes finding that kind of time with a 4yr old, 2yr old, and 10 month old trying to “help”. 

 Sansa Salad

This salad is easily a meal on its own, but it also makes a great first course with a smaller portion size.  I was unable to find edible flowers to garnish my salad with since it’s not the right season, but hopefully the next time we try this recipe I’ll be able to get my hands on some fresh ones.

7c Baby Spinach

1c Fresh Mint Leaves

1c Diced Prunes

½ c Candied Walnuts

½ c Fresh Lemongrass, thinly sliced

Optional:  ¼ c Edible Flowers (usually you can find these near the packages of fresh herbs in the produce section)

Raspberry Vinaigrette

Combine all ingredients in a large bowl.  Toss and serve.  You can toss the dressing, or you can leave it off and let each person add as much as he or she wants. 
This salad was amazing.  I’m actually excited that we have leftovers plus enough ingredients left to make it again.  I think it would be great with some grilled chicken maybe even a feta or a blue cheese if you are looking to add more protein and make a full meal out of it.  It stands alone perfectly, and I only wish I could have gotten my hands on those flowers just to add an extra pop of color and texture. 

Thursday, March 13, 2014

Its Been One of THOSE Kind of Weeks....

Ok, so I've been horrible at making meals for the family this week.  I've got a teething baby whose been screaming and refusing naps for days now, and we just started IEP month.  My middle child has a couple evals coming up along with her IEP meeting for school, and my oldest has his annual review coming up soon.  I'm exhausted, and honestly, its been one of those kind of weeks where I've given into the kiddos wants.  They may have gotten their way and had granola bars, cereal bars, cheese crackers, and other easy to grab foods on more than one occasion.  I would feel guilty about it except that I am too tired to care!

I did get a chance to prepare an awesome meal that is literally "fit for a king" today. If you are a Game of Thrones fan, you are going to love the recipes I'll be reviewing and sharing tomorrow.  I have a lot of typing to do, but I'll leave you with an amazing teaser pic.

Quite possibly one of the best roasts I've made. 

Saturday, March 8, 2014

Lemon Pepper Tilapia

I was walking through Sams Club yesterday with my three little ones, and it just so happened that they had tons of samples in every aisle.  You know its going to be a good shopping trip when you walk through the door and the first sample they have happens to be your kids favorite candy (M&Ms).  The kids had a blast, and were happily occupied while mommy shopped.  When you have 3 kids 4 and under, this is quite the accomplishment. 

Anyways, one of the samples they had was fresh tilapia.  I got a sample for myself, and it was amazing.  It must have smelled pretty good because my 2yr old and my 10 month old both decide to inhale that sample.  Whenever my kids try a new food and like it, I make a point of buying it so we can expand our dinner menu at home.  I asked the lady which seasonings she used, looked over how she prepared it, and then I went home to recreate the recipe. I had the seasonings, but realized after we were home I didn't have any olive oil.  I did have some coconut oil on hand, so I decided to use that in its place.

Lemon Pepper Tilapia


4 tilapia fillets
1tbsp coconut oil
lemon pepper seasoning
sea salt

Lay your fillets on a cutting board or on a cookie sheet.  Sprinkle some lemon pepper seasoning and sea salt on each fillet and rub it in.  Turn each fillet over, and repeat.  In a skillet on med heat, melt the coconut oil.  Cook 2 fillets at a time.  You want to avoid over crowding the pan.  It makes for more even cooking.  Cook for 3-6 minutes, then flip and continue cooking for an additional 3-6 minutes (you may need to flip again if your fillet is thicker).  The tilapia will be flaky when it is finished cooking.

Like any true child, once I prepared the fish, none of mine wanted to touch it.  As soon as I had my own plate made though, they all swarmed me and ate all my food.  In the end, mommy still got them to eat something new, so I consider this a win for me. 

Wednesday, March 5, 2014

House Party and Kitchen IQ

Have you heard about House Party?  If you haven't, you are missing out!  It is a great website that offers up parties from various brands.  If you see a party you might be interested in, simply fill out an application.  There are activities you can do to increase your chances to be selected.  Hosts get a package of goodies to share with their guests.  Sometimes its samples.  Sometimes its coupons and/or rebates.  Other times its full size products.  Most of the parties that are posted require no purchase. 

I got selected for the Kitchen IQ party!  You have no idea how excited I am to be hosting this party.  I love kitchen gadgets!  It's the perfect party for me.  Here's a list of goodies that I will receive for hosting this party:

  • 1 Angle Adjust Manual Knife Sharpener
  • 1 Apron
  • 1 Cutting board
  • 1 KitchenIQ kitchen tool
  • Knife skills bookmark
  • Recipe booklet
  • Kitchen IQ Rebates
  • Coupons for Cabot Cheese
  • Cabot Cheese recipes

  • All I have do is invite my friends over for an afternoon of food and fun.  I'll show off what I received, and share coupons and recipes.  It's great for us because we get to see and try products we haven't heard of before, and its great for the company because it gets their products and name out there. 


    Check out this link to see more info on this party!

    http://www.houseparty.com/event/kitcheniq

    Seriously, if you haven't done it yet, sign up for House Party today! 

    Saturday, March 1, 2014

    Quick (and easy) Swedish Meatballs


    Most of the time, I prefer to make my meals from scratch.  I don’t always get the time to do so.  I have three young kids, and sometimes I don’t have the energy or the time.  Other times I just don’t have all the ingredients needed to make a full meal from scratch, so I rely on some convenience products to help speed up the process a bit.  This is happens to be the case tonight.  I really wanted to make Swedish Meatballs, but I didn’t have time to make my own meatballs.  I also didn’t have any heavy cream in the fridge.  I did have a few other products in the house though, so I came up with a quick version.  While it’s not the traditional recipe, it does taste pretty good in my opinion.

    Quick (and easy) Swedish Meatballs

    1 can cream of mushroom soup (10-3/4oz)

    1/2c sour cream

    1/3c milk (2% or whole)

    1tbsp dried parsley flakes

    1tbsp onion powder

    1/2tsp black pepper

    1/4tsp sea salt

    1/4tsp nutmeg

    1 bag frozen meatballs

    Combine all ingredients minus the meatballs in a bowl.  Place frozen meatballs in a skillet and cover with sauce.  Heat covered on medium, stirring occasionally.  These are great served over cooked egg noodles. 

    Thursday, February 27, 2014

    Lactation Cookies

    I thought I posted this recipe a while back, but I guess I didn't.  I came up with this recipe when I was trying to create a tasty cookie recipe to boost my milk supply. 

    Lactation Cookies

    ½ c butter (1 stick)
    ¼ c coconut oil
    1 c. brown sugar (**I make my own…. See note at the bottom for recipe**)
    ½ c white sugar
    2 eggs
    1 tsp vanilla
    1 tsp baking soda
    1 c oatmeal
    1 ½ c flour
    3 tbs flax seeds
    12 oz of bittersweet, dark, or milk chocolate chips (I used Hersey’s milk chocolate for my first attempt)

    Preheat oven to 350F.
    Beat butter, coconut oil, and sugars together.
    Add 2 eggs and vanilla, and then beat well.
    Next add baking soda, oatmeal, flour, and flax seeds. Mix everything well.
    Finally add your chocolate chips.
    Bake for 8 minutes. Cookies should be brown around the edges and looking somewhat doughy in the middle. If the middle looks too doughy, bake for an additional 1 minute.
    Let cookies rest on pan for 3 minutes. This will cook the center a bit more, but not burn your cookie. Cookies will be soft, so carefully transfer them to a wire rack to cool.

    **Homemade Brown Sugar**
    1 tbsp Molasses
    1 cup white sugar

    Mix together. The mixture will look clumpy at first, but keep mixing. After a couple minutes of mixing it will start resembling brown sugar.

    Wednesday, February 26, 2014

    COLORFUL Sensory Rice

    We are pretty big on encouraging sensory play in our house.  My 2yr old daughter has albinism.  She is visually impaired, so I try to find ways to get creative with our sensory play and arts and crafts time.  One thing she is really getting into is playing with dry rice.  By making it bright and colorful, it is easier for her to see and manipulate with tools.


    Sensory Rice

    1c white rice

    1tbsp white vinegar

    4 drops food coloring (more or less depending on how intense you want the coloring to be)

    This is a great recipe to have your kids help with!

    I used sandwich sized plastic baggies (the kind that seal, not the fold and tuck baggies).  They are the perfect size for 1 cup of rice.  If you are making a larger batch of one color, use a bigger bag.

    This recipe is very easy.  Place rice in the bag.  Add the vinegar, then the food coloring.  Close the bag and make sure it is sealed properly.  Then you can shake it.  Make sure all the rice has been covered by the vinegar/food coloring mixture.  Once it is covered, lay it out on a cooking sheet to dry.  Make sure to spread out the rice so it dries faster.  It will take about an hour to dry, longer if you use more rice. 

    We made 4 cups total and used 1 cup of rice for each color (red, blue, green, and yellow).  You can keep the colors separate, or mix them all together for rainbow rice.  You can use it to make a sensory sandbox, or use it in place of glitter or sand in arts and craft projects.  The best part about this recipe that this is an edible recipe.  You can dye your rice and use it to make some creative, kid friendly, rice recipes.  Follow the instructions for dying it, and once it is dry store it in an air tight container.  Cook as per the instructions on the original bag of rice.  Obviously if you plan on eating it, don’t let your kids place with it before you cook it. 

    Friday, February 21, 2014

    Freezer Meals Saved the Week!

    I have to apologize for the lack of recent posts.  This momma has been out of commission this week.  I got hit hard with a nasty stomach bug.  Go figure.  My cupboards were getting bare, and my fridge was near empty.   Thankfully I still had a few items left in the freezer from my crock pot challenge.  Now, I'm not entirely done with that challenge yet as I still have to post my review of the taco soup, but with the exception of that one recipe, we've had the rest.  Many of the recipes were divided in half, and that came in very handy this week as this momma was in no shape to do any cooking. 

    I can't say how much I highly recommend freezer cooking.  Even if you don't like to cook and prefer prepackage and convenience items, freezer cooking can save the day.  Whether its you don't have the time to cook, or you end up having a dreaded sick day, freezer cooking can take the stress of making a meal away. 

    My original plans were to follow up this challenge with another, but I'm going to have to delay that for a couple weeks.  I had to do a grocery shopping trip this week, but as I am still feeling pretty rough, I was not able to do the meal planning that I originally wanted to do.  For my next challenge I had planned on doing a complete break down on brand and prices on my shopping list, and that just simply was not going to happen this week.

    Anyways, stay tuned because I do have more recipes coming, I have the conclusion and final review of my crock pot challenge, and there is going to be some party planning as I get ready for daughter's third and first birthday parties.  I will also show a bit of my geeky side as I plan on testing out my Game of Thrones cookbook for the season four premier. 

    Monday, February 17, 2014

    Oatmeal Flaxseed Banana Bread


    I love banana bread.  This is a recipe I came up with a few months back.  I was looking for something different.  I wanting a filling breakfast bread that I could eat in the morning.  With three young kids, I don’t always have time to make something for myself in the morning before we have to be out the door.  I am also breastfeeding my youngest, so in an effort to boost milk production, I want to create a recipe that included both oatmeal and flaxseed.  These two foods are thought to help boost the milk supply in breastfeeding women.  I can’t guarantee it will work for everyone, but it did help me.  Don’t worry this is a recipe that the whole family can enjoy.  My youngest two especially love this bread. 

    Oatmeal Flaxseed Banana Bread

    5 ripe bananas, mashed

    1 egg, beaten

    1/2c sugar

    1/2c butter (1 stick)

    1tsp vanilla

    2tsp baking powder

    1/2tsp cinnamon

    1/4tsp nutmeg

    1/4c ground flaxseed

    1 1/2c flour

    1/2c old fashion cooking oats (oatmeal)

    Preheat oven to 350*F.  Grease a bread pan.

    In a large mixing bowl, combine bananas, egg, sugar, butter, and vanilla.  Set aside. 

    In a medium bowl combine your remaining ingredients.  Slowly add your dry ingredients to the banana mixture. 

    Bake for 1hr-1hr 15 minutes.  Check for doneness by inserting a toothpick into the center of the loaf.  If it comes out clean it is done.  Allow the banana bread to cool completely on a wire rack before you remove the loaf from the pan.
    I totally recommend drizzling some honey across the top during the final 10 minutes of the baking process.  Just remember, honey is NOT recommended for infants under the age of 1 due to the risk of infant botulism. 

    Friday, February 14, 2014

    Here Comes Another Crock Pot Meal... It's Lemon Garlic Chicken


    I had high hopes for the Lemon Garlic Chicken crock pot meal.  It sounded good, but like a few other recipes, the original turned out pretty bland in my opinion.  It was fine after I adjusted the seasonings once I was cooked, and I will make this one again in the future.  I made a couple minor adjustments to the original recipe.  I think this version will have a little more flavor.  
     

    Lemon Garlic Chicken

    1tsp dried oregano

    2lbs chicken breast, chopped

    2tbsp butter

    1/4c water

    3tbsp lemon juice

    1tbsp lemon zest

    3 cloves garlic, minced

    1tsp chicken bouillon granules

    1tsp parsley

    1 8oz package of cream cheese

    Salt and pepper to taste


    Place all ingredients, minus the cream cheese, in a gallon size freezer bag. 

    Cook for 6-8hrs in the crock pot.  Once chicken is cooked, add the cream cheese and mix well.  Add salt and pepper to your preference. 


    Tuesday, February 11, 2014

    Baked French Toast.....It's One of My Family's Favorite Recipes!

    Last night we decided to take a break from the crock pot.  I was in the mood for one of my all time favorite recipes, Baked French Toast.  My family loves breakfast foods.  We often have breakfast for dinner.  Baked French Toast is a dish I frequently make when we have company.  Its fairly easy to make, and pretty filling. 

    Baked French Toast
     
    12 slice of bread
    No apples in this batch, but maybe next time. 
    6 eggs, beaten
    1c milk
    1c brown sugar 
    1/2c butter (1 stick)
    1tsp vanilla
    1/4tsp cinnamon
    Optional: 2 granny smith apples; peeled, cored, and diced

    Grease a 13x9 baking dish.  Melt the butter, and combined it with the brown sugar and cinnamon.  Spread this across the bottom of the baking dish.  Place the bread in the pan, laying 6 slices on the bottom and laying another 6 on top of those.

    In a mixing bowl, combine eggs and milk.  Pour egg mixture over the bread.  Let the bread sit for 5 minutes.  This gives the bread a chance to really soak up the egg mixture.

    Bake at 350*F for 35 minutes. 

    Optional:  If you decide to add the granny smith apples, layer them on top of the brown sugar, butter, and cinnamon mixture.  I really recommend trying this recipe at least once with the apples.  You won't regret it!

    Saturday, February 8, 2014

    Working on a Party

    I love planning parties!  I love creating themes.  I love shopping for the decorations.  I love planning the food.  I especially LOVE planning parties for my children. 

    Both my girls have birthdays coming up in April.  One is turning 3 and the other will be 1.  Their birthdays are nine days apart, so we will be doing a combined party for the two of them.  Its been difficult trying to decide a theme this year.  I want to do something different and fun.  I've been tossing a couple ideas back and forth for a few weeks now.  I'm thinking about doing a Candy themed birthday.  My kids rarely get candy, but when they do, its they think its the greatest experience of their lives. Seriously, Ava even made up a song all about candy canes the other day. 

    I'm working on building a fun candy themed party pinterest board.  I'll be sharing my ideas as I start planning the party.  I can't wait to see how it comes together.

    Click to see the board. 

    Thursday, February 6, 2014

    Savory Chicken? Eh, Not so Memorable

    I apologize, but no pics with this one. I've had a busy couple days.  I have been busily trying to put my degree to use, and unfortunately I have had to turn down a couple jobs recently due to inflexibility and/or the hourly wage being too low.  I've been so busy running around trying to plan and make things work,  and I am beyond thrilled that I decided to do this month long challenge.  I think we would be living on take out this week without it. 

    Savory Chicken was another recipe from Crock Pot Meals for a Month that I wasn't sure about.  I think my issue was that I tried to use frozen broccoli instead of freeze.  My end result was a watered down chicken dish that I salvaged by shredding the chicken and thickening up the cooking liquid with a cornstarch slurry.  Salt and pepper are a must, otherwise the end result is terribly bland.  The dish wasn't terrible, but its not something I plan on going out of my way to cook again.  I do have another bag frozen in the freezer to get through, but after that I may try to play around with the recipe to improve the flavors.

    Savory Chicken

    4-6 Chicken Breasts
    2 15oz cans of Stewed Tomatoes
    1 1/4c Chicken Broth
    1 Onion, diced
    4 Garlic Cloves, minced
    4c Broccoli
    2 Bay Leaves (do not eat these...they are just for adding flavor)
    Salt and Pepper to taste

    Divide all the ingredients between 2 gallons size freezer bags.  Cook for 6-8hrs.

    I shredded the chicken and served it over seasoned rice. 

    Sunday, February 2, 2014

    BBQ Pineapple Pulled Pork in the Crock Pot


    You are going to LOVE this recipe!  It can be a little labor intensive when it comes to pulling/shredding the meat, but it is worth it.  This recipe does take a while to cook, so make sure you read the directions thoroughly so you understand the amount of cook time needed.  This is another one of those recipes from the Crock Pot Meals for a Month challenge that we will be making again.  If you don’t eat pork, you can easy substitute chicken in its place. 

    
    I love ketchup on my cheesy potatoes!  No judging.  lol
    BBQ Pineapple Pulled Pork

    1 4-6lb pork shoulder roast

    1 bottle of your favorite BBQ sauce

    1 15oz can of pineapple tidbits, juice and all

    salt and pepper

    Rub roast with salt and pepper.  Place inside gallon sized freezer bag.  Add other ingredients and freeze.

    Cooking from frozen:

    Allow at least 6-8hrs for roast to fully cook. 

    Cooking from fresh:

    Rub roast with salt and pepper.  Place in crock pot with other ingredient.  Cook 5-8 hrs.

    Remove roast once cooked, and place on cutting board.  Use 2 forks to pull apart and shred the meat.  Return the meat to crock pot and let cook in juices for another hour or so.

    **I cooked my roast from frozen for 8hrs overnight.  I then turned off the crock pot, shredded the meat, and let it cool before placing in the fridge.  The next day I returned it to the crock pot, and cooked for an additional 4 hours.  This gave the meat additional time to marinate and absorb more of the flavor.  If you have the time, I highly recommend cooking it this way. 

    Thursday, January 30, 2014

    We're Still Crocking! Time for Pizza Soup and Cheesey Breadsticks


    Pizza soup was one of those interesting recipes that I wasn’t entirely sure how it was going to turn out.  I personally thought it sounded a little strange, but I figured since I was committing to the rest of the recipes, that I had to make this one too.  Really, the only thing I changed from the original recipe (posted here) was I added more Italian sausage to make the soup a little heartier. 

    It really does taste like pizza, a supreme pizza to be exact.  I was a little thrown off about the texture at first.  Pepperoni is a soup is kind of weird, especially when the soup tastes like pizza without the crust.  I totally recommend serving this with some cheesy breadsticks.  They pair quite nicely. 

    Pizza Soup

    1 14oz jar of pizza sauce

    3 empty jars of water

    1 green pepper, diced

    ½ red onion, diced

    1c baby portabellas, sliced

    1c grape tomatoes, quartered

    4 cooked Italian sausages, diced

    1c sliced peperoni, quartered

    1/2tsp dried basil

    1tbsp dried oregano

    Optional:  Pasta

    Divide all ingredients between 2 gallon sized freezer bags.  Lay flat when freezing.  This creates a thinner bag, making it easier to fit in most freezers.  If you decide to add pasta, do not add it to the soup until it is cooked. 

    Cook in crock pot for 4-6 hours.


    EASY Cheesy Breadsticks

    1 pre-made pizza crust

    1tbsp olive oil

    1-2 cloves garlic, minced

    ¼ tsp dried basil (more or less depending on your preference)

    ¼ tsp dried oregano (more or less depending on your preference)

    Shredded mozzarella cheese

    Preheat oven to 350*F.  Brush olive oil on crust.  Sprinkle on garlic and herbs.  Top with cheese, and bake for approximately 10 minutes.  Cut into wedges or stick shapes. 

    Wednesday, January 29, 2014

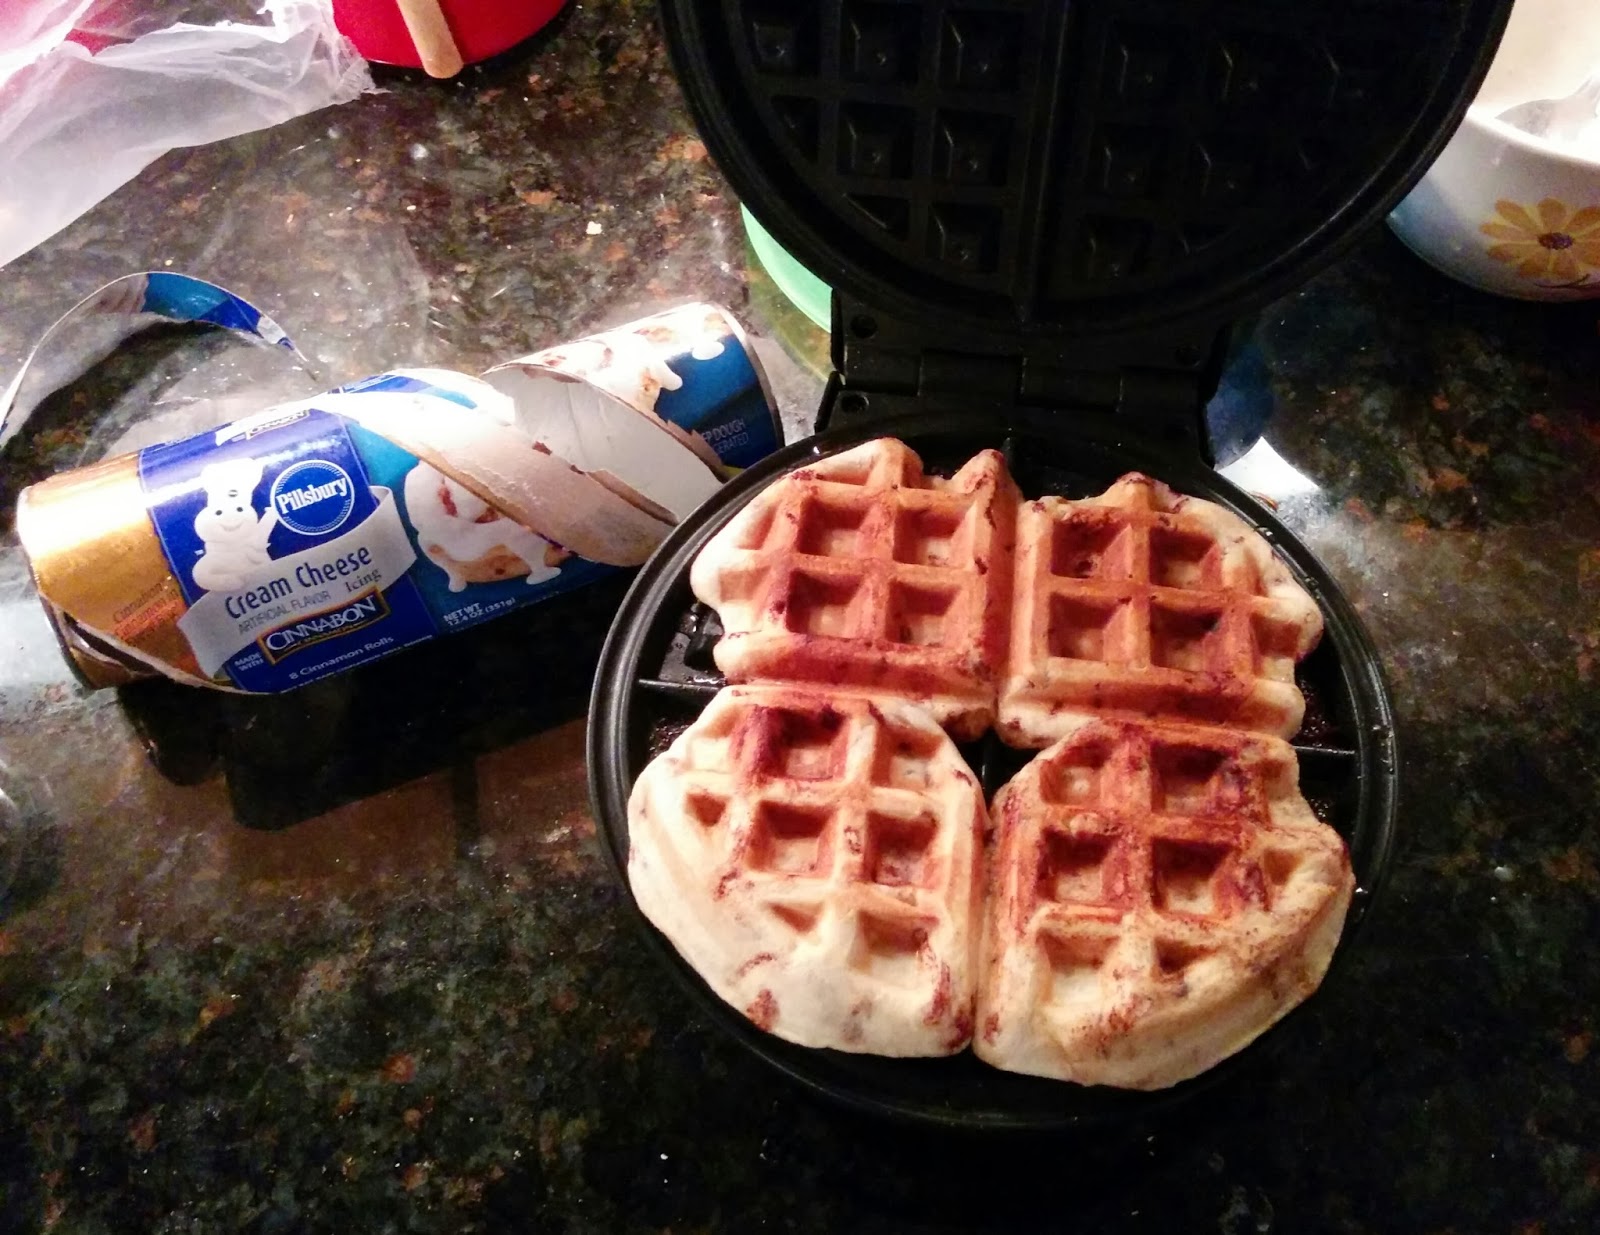
    EASY Cinnamon Roll Wafles

    I was flipping through Facebook last night and I saw a couple posts about various life hacks.  Life hacks are suppose to be things you can do, make, or use to make everyday tasks a bit easier.  I've seen a few floating around that I waned to try, but I saw one for Cinnamon Roll Waffles yesterday.  I had all the supplies on hand, so I decided to give I a try. 

    Cinnamon Roll Waffles
    Here's what you need:
    1 can refrigerated cinnamon rolls
    waffle iron
    cooking spray

    Spray waffle iron to prevent sticking.  Preheat your iron.  Place 4 rolls on your waffle iron (depending on size and shape, and if you have a double iron you may be able to fit more).  Cool for approximately 2-5 minutes.  Be sure to follow the cooking recommendations of your waffle iron. 


    I found I needed to push the top of the waffle iron down because the cinnamon rolls wanted to rise as they were cooking.  I cooked all 8 rolls in under 10 minutes.  I never would have though to use my waffle iron to make these.

    My four year old is a picky eater.  Normally he wouldn't eat a cinnamon roll, but he ate two!  My two year old couldn't eat them fast enough.  This mommy loves this idea, and I will definitely be picking up 2 cans the next time I plan on making them. 

    Tuesday, January 28, 2014

    Crock Pot San Francisco Pork Chops

    I think I need to do these freezer cooking and crock pot challenges more often.  The amount of time I've saved myself over the last couple weeks has been amazing.  I love it!

    Last night we decide to try out the San Francisco Pork Chops recipe from Crock Pot Meals for a Month.  My house smelled amazing while it was cooking, and the pork chops tasted just as good as they smelled.  This recipe really didn't need much of a change from the original.  I opted not to sear the meat prior to placing in the crock pot since I froze everything together. This will be a recipe that I make again. 


    San Francisco Pork Chops, Mixed Veggies, Whole Grain
    Wild Rice, and Tapioca Pudding
     
    Slow Cooker San Francisco Pork Chops

    4 pork chops, bone out and thick cut (about 1in quick)

    2 cloves garlic, minced

    1/4c reduced-sodium soy sauce

    1/4c chicken broth

    2tbsp brown sugar

    1/4tsp red pepper flakes

    1tbsp cornstarch

    1tbsp cold water

    Place all ingredients minus the cornstarch and water into a gallon size freezer bag.

    To cook, place ingredients (minus the cornstarch and water) in a crock pot and cook for 5-8hrs.  Once pork is cooked, remove from crock pot and transfer to a plate.  Whisk together cornstarch and water, and then stir it into the cooking liquid in the crock pot.  Return pork to crock pot and continue cooking for 30 minutes. 
    ***Mixing the cornstarch and cold water together creates a slurry which is used as a thickening agent for the sauce.  It is important to wait until everything is cooked prior to adding this.  The longer it cooks once it has been added, the thicker the sauce will become, and if added too early the sauce may become too thick. 

    Saturday, January 25, 2014

    Need an Easy and Tasty Dip?

    Who doesn't love nutella?  I swear one of the main ingredients has to be crack or something.  I couldn't get enough of it when I was pregnant with my 3rd.  Don't judge, but I ate it by the spoonful directly from the tub. 

    I can no longer find the original blog I first discovered this super tasty nutella dip, but I'll share with you my version. 

    Nutella Dip


    1c Nutella (I like to add an extra 1/2c sometimes)
    1c Vanilla Yogurt
    1/2c Cool Whip

    Mix all ingredients well.  Garnish with whipped cream and mini chocolate chips.

    This dip is great for fruits, pretzels, cookies, and even great as filling for crepes. 

    I warn you, this dip will be much loved by everyone who tries it.  It is one of my favorite go to dips. 

    Friday, January 24, 2014

    Crocking Continues... This Time Its Chicken and Spinach

    I knew it was going to happen sooner or later, but I finally found a recipe from Crock Pot Meals for a Month that I really didn't like at all.  I'm not even going to post a pic of it because I had to doctor the original recipe so much that it ended up being something completely different. Instead, I've decided to re-work the recipe to create something that has a bit more flavor.  In my opinion the original recipe was far too bland and watery to really be able to enjoy any of the actual flavors from the ingredients themselves. 

    Below is my alternative version of the original recipe.  This is what I will make the next time I plan some freezer cooking. 


    Chicken & Spinach

    Split this recipe between 2 gallon sized freezer bags.

    6 boneless, skinless Chicken Breasts

    2 jars pasta sauce (one per bag)

    1 onion, diced

    1 green pepper, diced

    1 zucchini, diced

    1 yellow squash, diced

    1 sm container of baby portabella mushrooms, sliced

    4 cloves of garlic, minced 
    2tsp Cajun seasoning

    1tbsp dried basil

    Salt and pepper, to taste

    Optional: rice or pasta

    Wednesday, January 22, 2014

    The Month of Crocking Continues with Chicken Curry


    It's been a few days into this Crock Pot Meals for a Month challenge that I started, but I can already tell you that I am loving how easy dinner has been for us.  I will pull out whichever meal we want out of the freeze and put it in the fridge the night before we plan on having it.  I'll put it into the crock pot around lunch time, and right around five or so hours later dinner is ready.  Its been a great time saver.  I will admit that Monday night we totally cheated and ordered pizza, but it was one of those days that we were out and about most of the afternoon. 

    (divide this recipe between two gallon sized freezer bags)

    Ingredients

    3tbs all-purpose flour

    4tbs curry powder

    2tsp ground cumin

    2lbs chicken

    2c sweet potatoes, peeled and chopped (I used 1 large sweet potato per bag)

    2c baby carrots

    1 mango, peeled and chopped

    1 zucchini, chopped

    2 cloves garlic, minced

    1c chicken broth

    salt and pepper to taste

    Optional:  raisins, peanuts, cashews…  to use as a garnish

    Cook for 4-6 hours on low.  Once the chicken was cooked, I decided to use two forks to shred the chicken.  If you wish to thicken your curry, you can make a cornstarch slurry from 1tbs cornstarch and 1tbs cold water.  Whish the two together, and then stir it into the curry 30 minutes prior to serving. 

    Make sure to taste and season your curry with salt and pepper prior to serving.  I found it to taste rather bland, but a little bit of salt and pepper greatly improved the flavoring.  I did not add the raisins, peanuts, or cashews because my kids do not like them. Overall my family really enjoy this recipe, and I’m glad they do because we have leftover to eat tonight, and an additional bag in the freezer.

    Monday, January 20, 2014

    Quite Possibly the BEST Cookies Ever!

    Yesterday I was trying to find something to do with my kiddos.  My 2 year old daughter was running around the kitchen asking for cookies, so I thought it might be fun to attempt to make some cookies with my kids.  My son decided he'd rather go play with his Legos, and my daughter got scared by the hand mixer.  Within the first five minutes it was just me and the baby left to do all the work. 

    I really want to make some sort of oatmeal chocolate chip cookie.  I turned to pinterest to find something.  This is what I found:

    Peanut Butter Chocolate Chip Oatmeal Cookies
    The recipe looked awesome, so I thought I'd give it a try.  I did make a couple small changes to the ingredients when I made them.  I felt there was far too much sugar in the original recipe, so I opted to reduce the amount of both the brown and white sugars by 1/4c each.  I used dark chocolate chips instead of semi-sweet.  I did not have any coco powder or peanuts on hand, so I left those out.  I also made a note about creaming the sugars and butters together for at least 10 minutes.  It results in a fluffy, creamy mixture, and really adds to the final product.  Below are the ingredients and instructions that I changed.  To see the original recipe click on the link above. 

    Dark Chocolate Peanut Butter Oatmeal Cookies

    Preheat oven to 350*F

    Ingredients


    1c (2 sticks) butter, softened

    3/4c granulated sugar

    3/4c brown sugar

    3/4c peanut butter

    2 lrg eggs, remove from fridge 30 minutes prior to using

    1tsp vanilla

    2c all-purpose flour

    2tsp baking powder

    1pkg dark chocolate chips

    1 1/2c quick-cooking rolled oats
    1. In a large bowl, cream butter, sugars, and peanut butter together for approximately 10 minutes. Beat in eggs one at a time, and then add vanilla, mixing until smooth.  Be sure to scrape the sides of the bowl as needed. 
    2. In another bowl, mix flour, baking powder, and salt.
    3. Slowly add flour mixture to the butter mixture, ensuring to mix well after each addition.  Once mixed, add dark chocolate chips and oatmeal.  Stir well.
    4. Drop dough in rounded 2-tablespoon portions, 3 inches apart, onto a greased cookie sheet, or use cooking parchment to line the cookie sheet.  Use a fork to flatten the dough into  2 1/2-inch rounds about 1/2 inch thick.
    5. Bake at 350*F for approximately 12 to 14 minutes until cookies are golden.  Cookies may feel under cooked, but let them rest of the cookie sheet for an additional 3 to 5 minutes.  Carry over cooking from the heat of the pan will finish the baking process. 
    6. Transfer to a wire cooling rack to finish cooling.  Once cookies are cooled.  Store in an air tight container. 
    My batch yielded 40 cookies, but I did make a couple pans on the larger side.  You could easily yield 4 dozen (48) cookies from this recipe.  They are very addicting, so be cautious when enjoying this recipe.

    Saturday, January 18, 2014

    Crockpot Meals for a Month.... Let the Crocking begin!


    Everything was split between two freezers. 
    If you read my previous post, I am trying out something I saw floating around facebook.  I am trying out a month of crockpot meals.  My meals are prepped and frozen, check out it out!  Seriously, make sure you have a lot of room in your freezer(s).  I  once all the recipes were made, I had 14 gallon sized freezer bags and one crockpot full of food. 

    I found another blog on Pinterest that had a shopping list prepared for all the recipes.  It was a great starting point, but as I was putting everything together, I notice it was missing a couple items.  I decided to put together my own list of items, following the original recipes posted here.


    Meat:

    ·        4-6lbs Pork Shoulder

    ·        8-10lbs Chicken

    ·        1 pkg Peperoni

    ·        2 pieces Italian Sausage

    ·        4 Pork Chops (thick cut)

    ·        4lbs Stew Meat

    ·        1lb Ground Beef or Turkey

    Canned Goods:

    ·        15oz Diced Pineapple

    ·        2 15oz cans Stewed Tomatoes

    ·        1 bottle BBQ Sauce

    ·        2 jars Pasta Sauce

    ·        2 cans Chicken Broth

    ·        1 bottle Reduced Sodium Soy Sauce

    ·        2 cans Dark Red Kidney Beans

    ·        2 cans Pinto Beans

    ·        2 cans Corn

    ·        1 lrg can Petite Diced Tomatoe

    ·        1 15 oz can Tomato Sauce

    ·        1 jar Pizza Sauce

    Produce

    ·        3 Green Peppers

    ·        1 bag of Onions

    ·        1 sm Red Onion

    ·        3 Zucchini

    ·        1 Yellow Squash

    ·        2 packages of Baby Portabellas, Sliced

    ·        1 bag Frozen Spinach

    ·        1 container Grape Tomatoes

    ·        2 Sweet Potatoes

    ·        2 bags Baby Carrots

    ·        1 Mango

    ·        1 bag Frozen Broccoli

    ·        1 bag Celery

    ·        1 bag Red Potatoes

    ·        Garlic

    Dairy:

    ·        Butter

    ·        1pkg Cream Cheese

    ·        Optional: Sour Cream, Shredded Cheese

    Mis.:

    ·        Chicken Bouillon

    ·        Salt

    ·        Pepper

    ·        Cajun Seasoning

    ·        Dried Basil

    ·        Dried Oregano

    ·        Red Pepper Flakes

    ·        Curry Powder

    ·        Cumin

    ·        Parsley

    ·        1pkg Taco Seasoning

    ·        1pkg Ranch Dressing Mix

    ·        Olive Oil

    ·        Brown Sugar

    ·        Quick Cooking Tapioca

    ·        1pkg Dried Lima Beans

    ·        Lemon Juice

    ·        Gallon Size Freezer Bags

    ·        Optional: pasta, rice, raisins/peanuts/ cashews

    The list is close to the original, but I added a couple items that were missing or that I found I was short on.  I also tried to organize it a bit more to make it easier while grocery shopping. 

    Lazy Day Stew

    Tonight I decided to start our month of Crockpot meals off with Lazy Day Stew. 


    4lbs of Stew Meat
    4c of Red Potatoes, chopped
    10oz pkg of dried Lima Beans
    4tsp quick-cooking Tapioca
    Salt and Pepper to taste
    1 15oz can of Tomato Sauce
    2tbs Brown Sugar
    4c Baby Carrots
    2 Onions, chopped
    2c Celery, chopped
    2c Water

    Divide all ingredients between 2 gallon sized freezer bags. 

    Defrost in fridge.  Dump bag into crock pot, and cook for 4-6 hrs. 

    **On the original blog post, the author omitted lima beans, and he tapioca.  Lima beans help make the dish more filling.  The tapioca is used as a thickening agent, and if you prefer a thinner broth stew, leave this step out.

    I used all ingredients listed in the recipe, and it turned out amazing. It is super filling, and very tasty.  The family loved it, and we have plenty of leftovers for another meal or two from just 1 freezer bag.  Overall, I'd say that this recipe was a success!